
















Ford F-150 16.2″ Tesla-Style Radio Installation Guide: Keep Factory Controls and Avoid Costly Wiring Mistakes
Ford F-150 Tesla-Style Radio Installation: Fit the 16.2″ Screen Without Losing Factory Controls
This iKAGOO guide explains what a 2015–2020 Ford F-150 Tesla-style radio installation actually involves. It covers dashboard disassembly, original climate-control transfer, connector identification, vehicle-specific wiring, pre-closure testing and the compatibility checks that should happen before purchase.
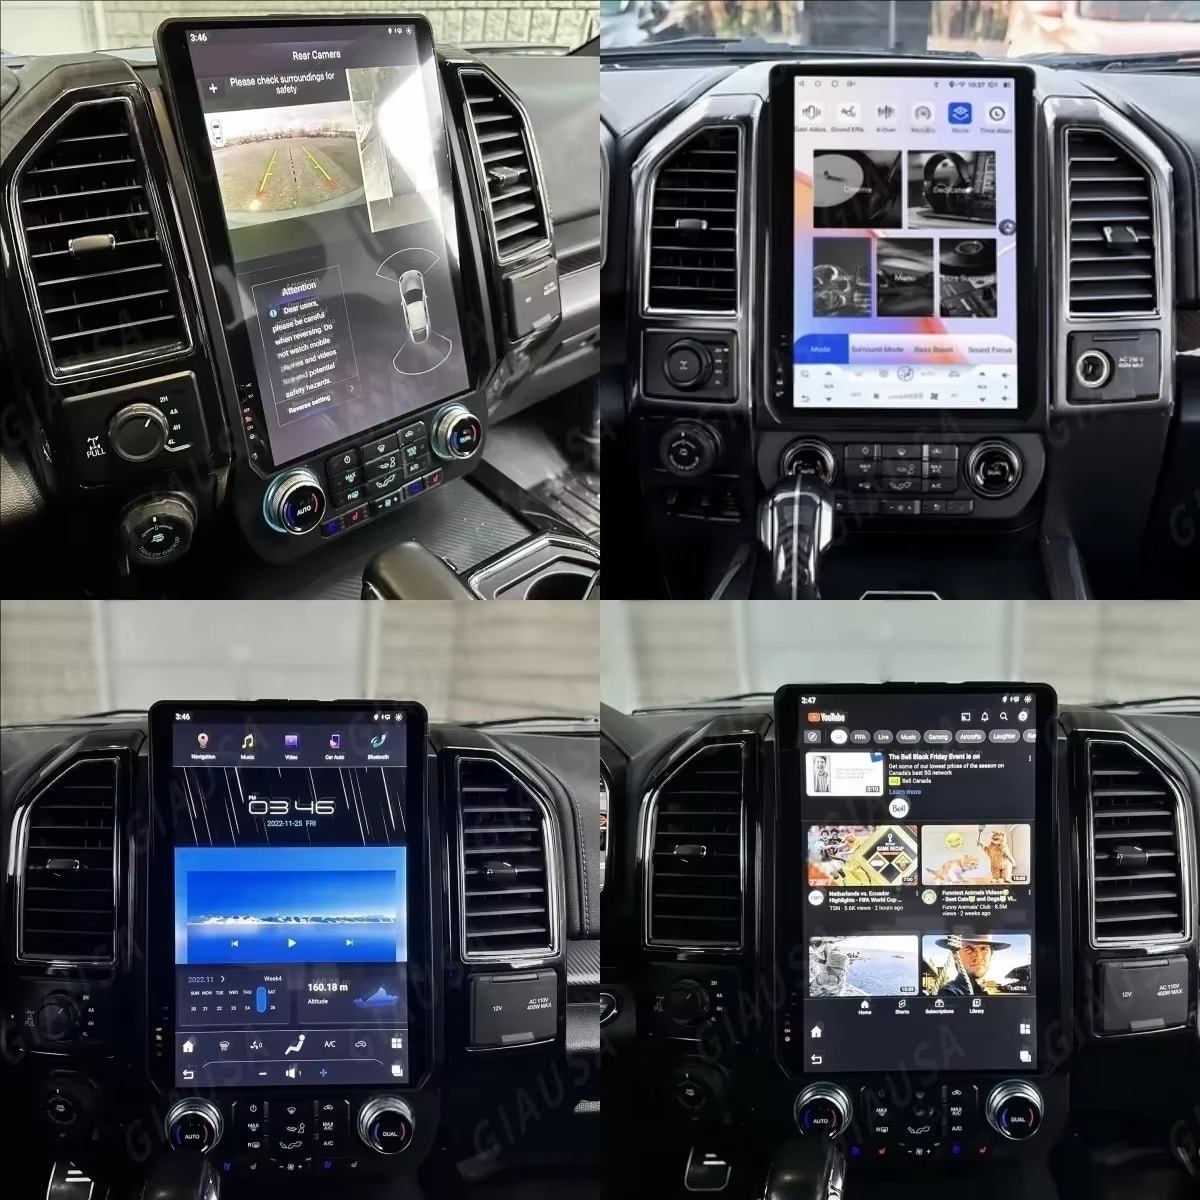
What Does This Ford F-150 Upgrade Actually Require?
This is not a simple screen attachment. The installation requires controlled dashboard disassembly, removal of the original display, transfer of factory controls, vehicle-specific harness matching, camera and audio checks, pre-closure testing and careful reassembly.
Why iKAGOO Does Not Recommend Ordering by Model Year Alone
Many aftermarket listings reduce compatibility to a year range. Real installation success depends on the original vehicle configuration. iKAGOO treats compatibility as a technical review, not a guess.
Compatibility Before Sale
iKAGOO reviews the original dashboard, screen, audio, camera and climate configuration before recommending the correct version.
Factory Functions Matter
A larger display is not enough. The purchase must also account for climate controls, steering-wheel controls, audio, cameras and other required original functions.
Responsibility After Purchase
iKAGOO treats installation guidance, troubleshooting and after-sales support as part of the product value rather than an optional extra.
Is This Ford F-150 Upgrade Worth Buying, Compatible and Practical to Install?
iKAGOO evaluates three separate buyer questions: whether the upgrade creates enough daily-use value, whether the supplied configuration can retain the required original-vehicle functions and how much installation skill is realistically required.
Recommended for Long-Term Owners
The 16.2-inch vertical display creates a substantial cockpit change and higher daily-use value for owners who want a larger interface and intend to keep their Ford F-150.
- Major visual modernization of the center stack
- Larger interface for frequently used infotainment functions
- Strong value for owners keeping the truck long term
- Original climate hardware is retained in the documented route
- The completed installation creates a more integrated cockpit appearance
- The work is Level 4 and is not a basic screen swap
- Correct fitment depends on the original truck configuration
- Audio, amplifier and camera integration require separate confirmation
- Owners satisfied with the factory system may not need this upgrade
Final Vehicle Score Issued After Review
The iKAGOO recommendation threshold is 95/100. A final vehicle-specific score cannot be issued from the model year alone. The actual screen, controls, amplifier, camera and connector configuration must first be reviewed.
- Factory climate controls and switch operation
- Steering-wheel control integration
- Factory amplifier and original audio system
- Rear camera or 360-degree camera configuration
- Original USB and applicable factory interfaces
- No new warning lights after installation
Professionele installatie aanbevolen
This is an advanced installation involving multi-stage dashboard disassembly, transfer of original climate hardware, vehicle-specific harness routing and complete retained-function testing.
- Upper speaker grille and center-stack trim must be removed
- The original display and radio assembly must be disconnected
- Factory climate-control hardware must be transferred
- Original clips and support parts must be repositioned
- Power, CANBUS, USB, camera and audio leads must be identified
- All retained functions must be tested before final closure
- A connector differs by shape, keying or pin layout
- Unexpected cutting or repinning appears necessary
- The transferred climate board does not align naturally
- The screen cannot sit flush without force
- A factory function disappears or a new warning appears
What Should Be Confirmed Before You Buy?
The safest way to avoid the wrong screen or harness is to confirm the original vehicle setup before the order is placed. This also creates more accurate expectations for retained functions.
Photos iKAGOO Should Review First
- Full front view of the original center stack
- Original display powered on
- Complete climate-control panel
- Hazard, ESC and camera-switch area
- Speaker grille and original audio branding
- Rear-camera or 360-camera display
- SYNC or system-information screen
- Vehicle model year and trim level
Stop and Recheck If
- A supplied connector does not match exactly
- The pin count or physical locking key is different
- A trim panel bends instead of releasing
- The control board does not align naturally
- Wire cutting or repinning suddenly appears necessary
- A factory function disappears after connection
- A new vehicle warning appears
- The screen will not sit flush without force
Step-by-Step Ford F-150 Tesla-Style Radio Installation
Photograph connectors before disconnection. Keep original screws, clips and modules organised by step. Do not use force to compensate for a mismatched component.
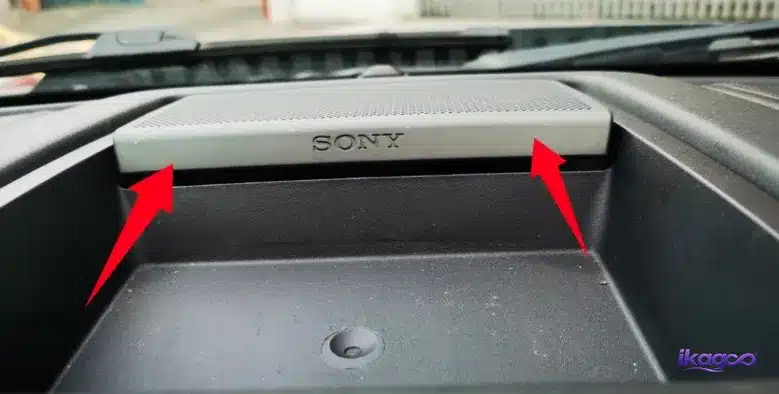
Remove the Upper Speaker Grille and Speaker Assembly
Start at the upper dashboard to expose the first center-stack fasteners.
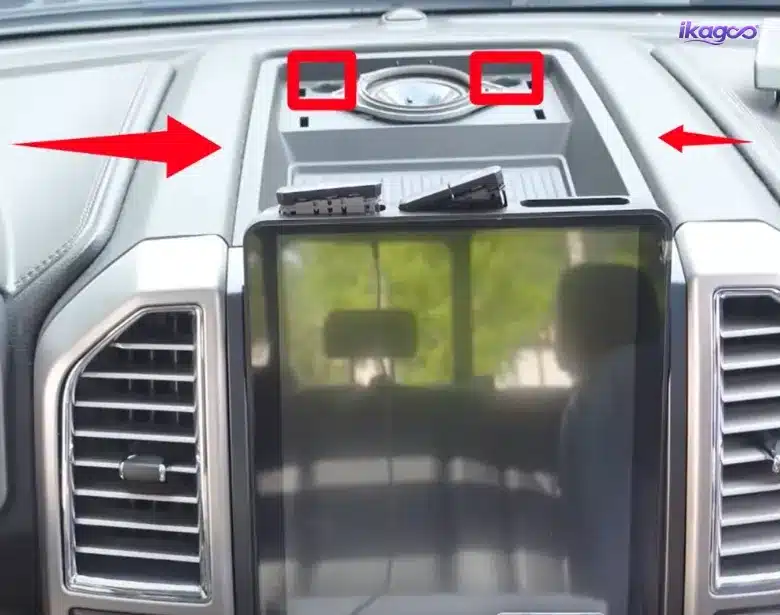
Use a plastic trim tool to release the upper grille without damaging the dashboard. Remove the exposed fasteners and lift the speaker assembly carefully.
A visible Sony mark documents the original audio configuration. It does not indicate a partnership or endorsement between Sony and iKAGOO.
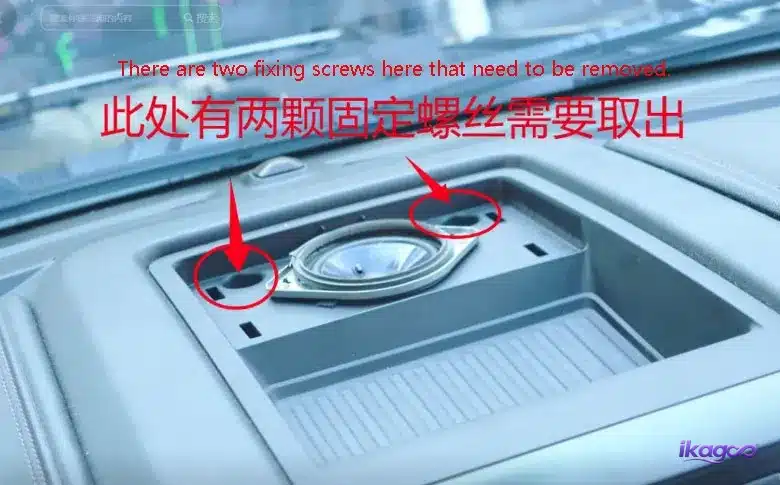
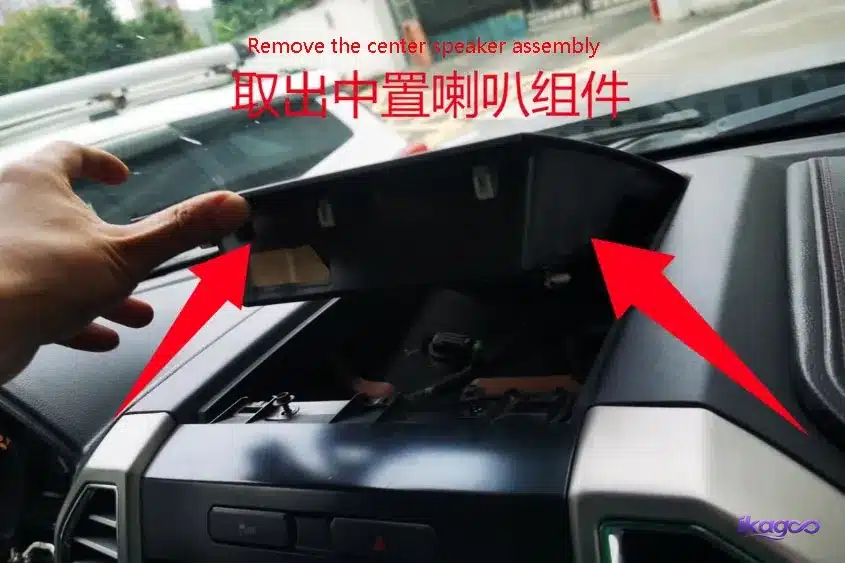
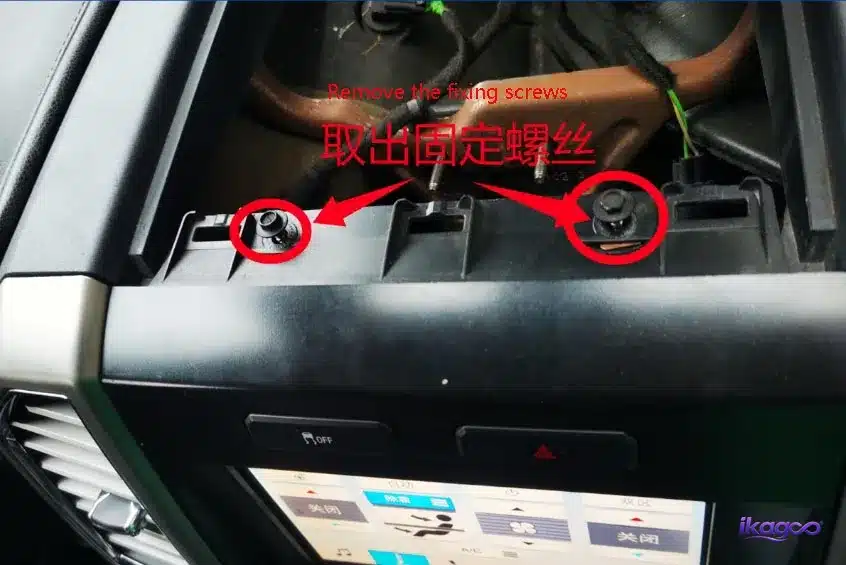
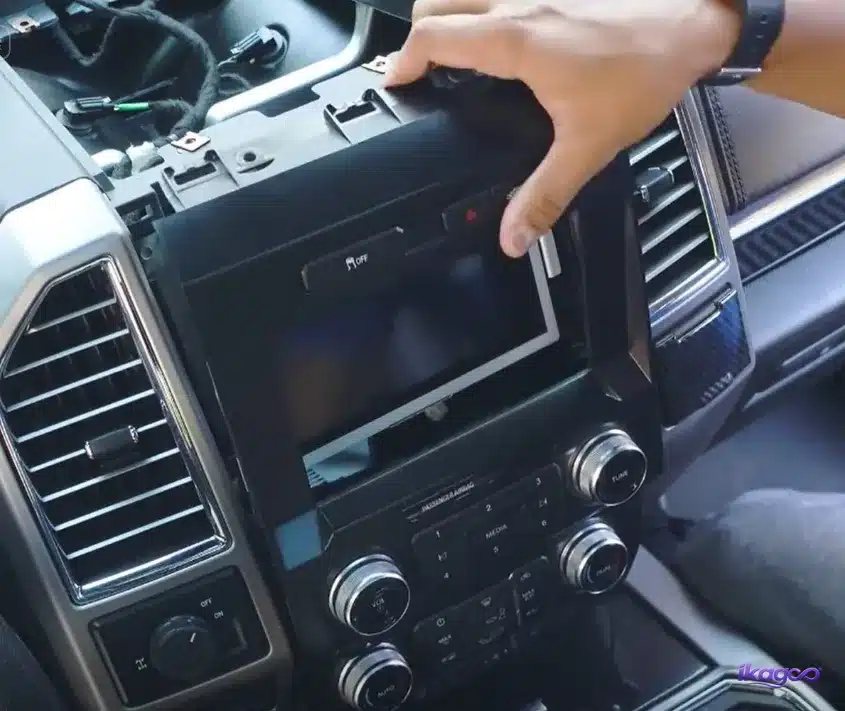
Remove the Center-Stack Fasteners and Main Panel
Remove every visible retaining screw before releasing the center-panel clips.
Use a 7 mm socket for the documented fasteners. Support the panel after the clips release and do not allow it to hang from its connected wiring.
Disconnect the Switch and Climate-Control Connectors
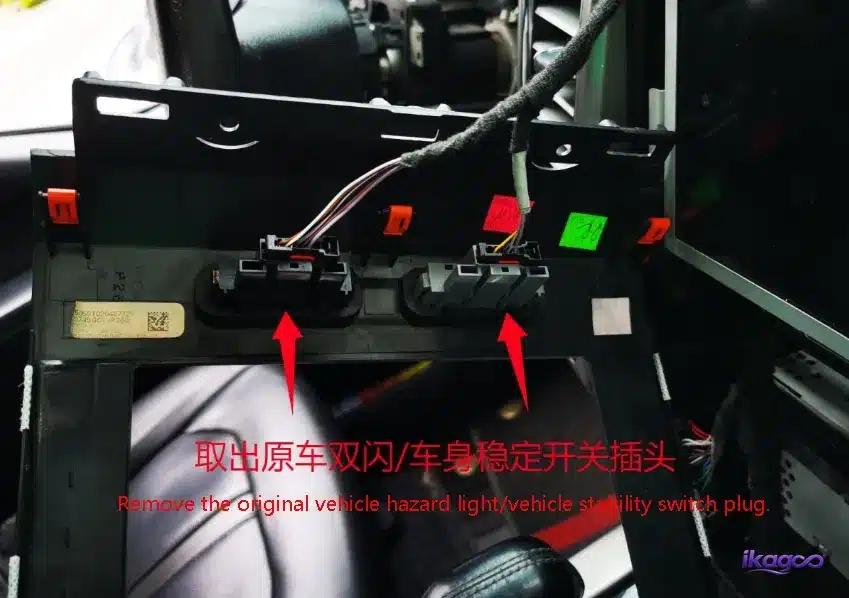
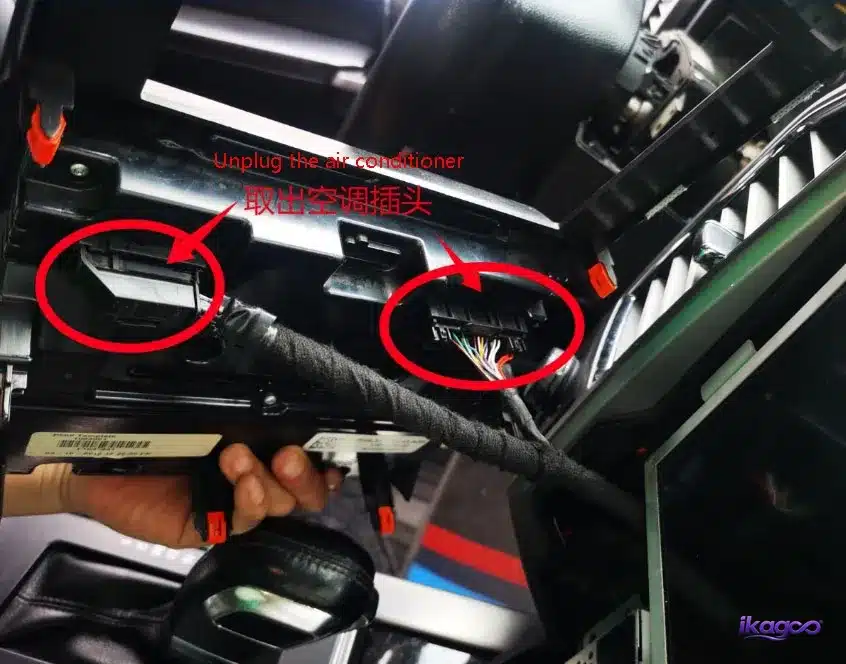
Photograph each connector position and locking-tab direction before unplugging it.
Disconnect the hazard and ESC switch connector, followed by the climate-control connector. Pull from the connector housing, never from the wires.
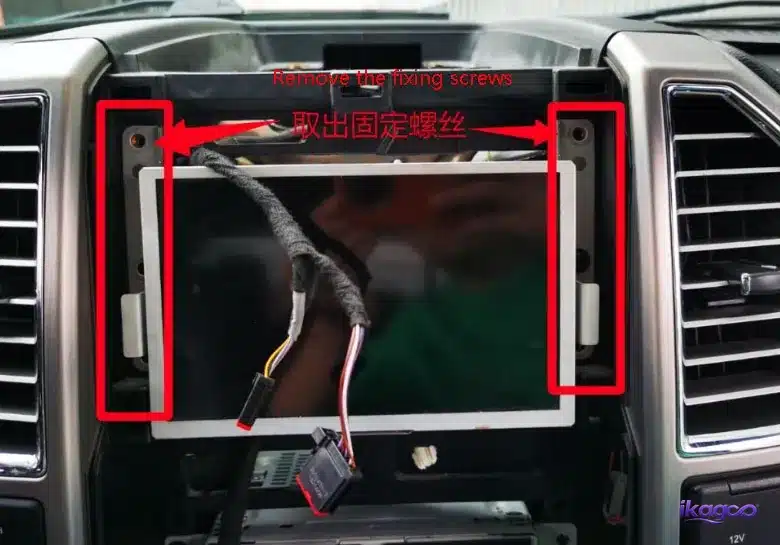
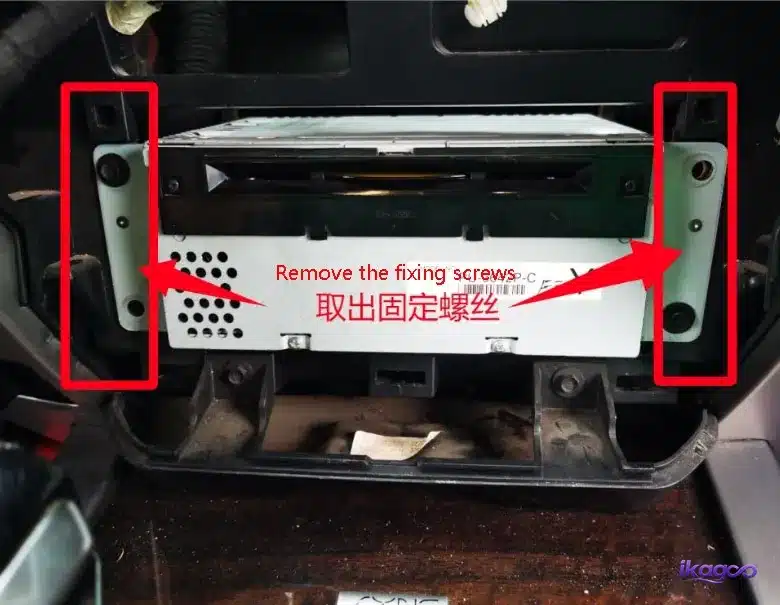
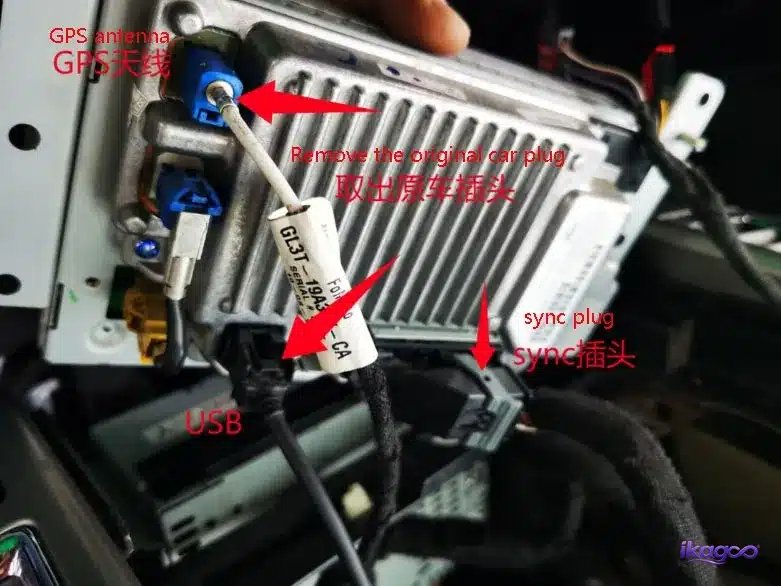
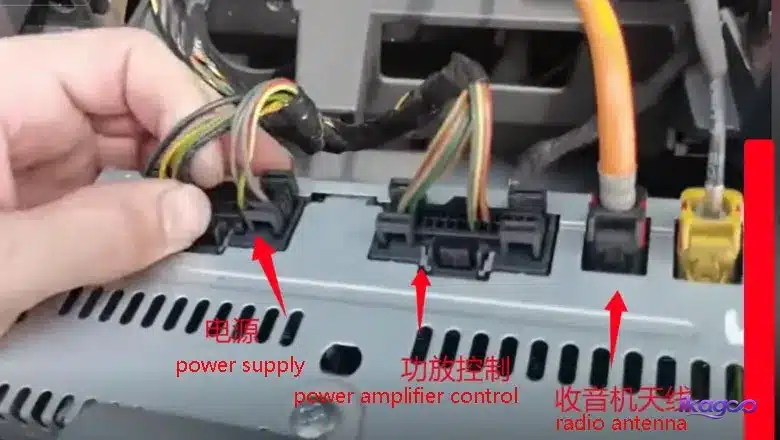
Remove the Factory Display and Identify Every Connector
Match connectors by shape, pin count, locking design and vehicle configuration—not by wire colour alone.
Remove the factory display and radio mounting screws while supporting the original assembly. Photograph the complete connector group before disconnection.
Transfer the Original Climate-Control Hardware
The original climate controls are physically transferred into the new vertical-screen fascia.
Place the original panel on a protected surface. Remove the retaining screws, lift the board carefully and transfer the original buttons and control hardware into the new housing.
Every component should align naturally. Do not use screws to pull a misaligned board into position.
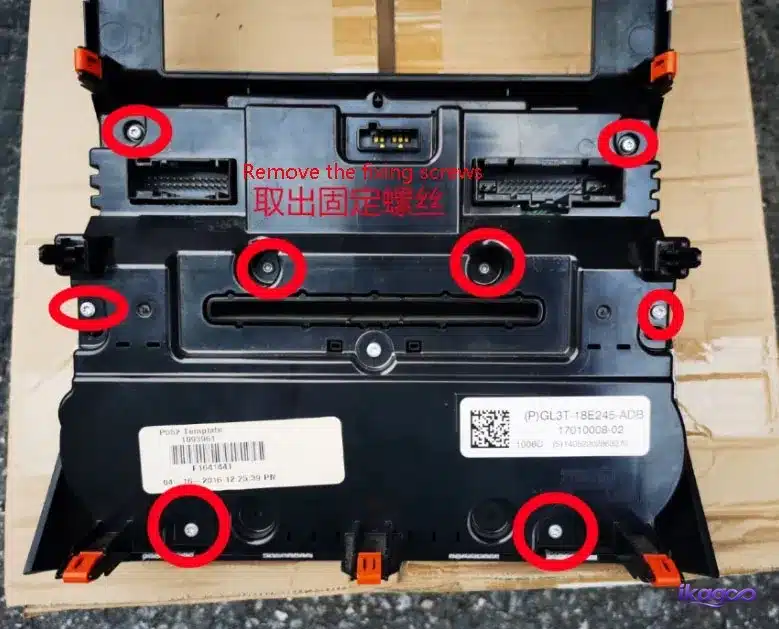
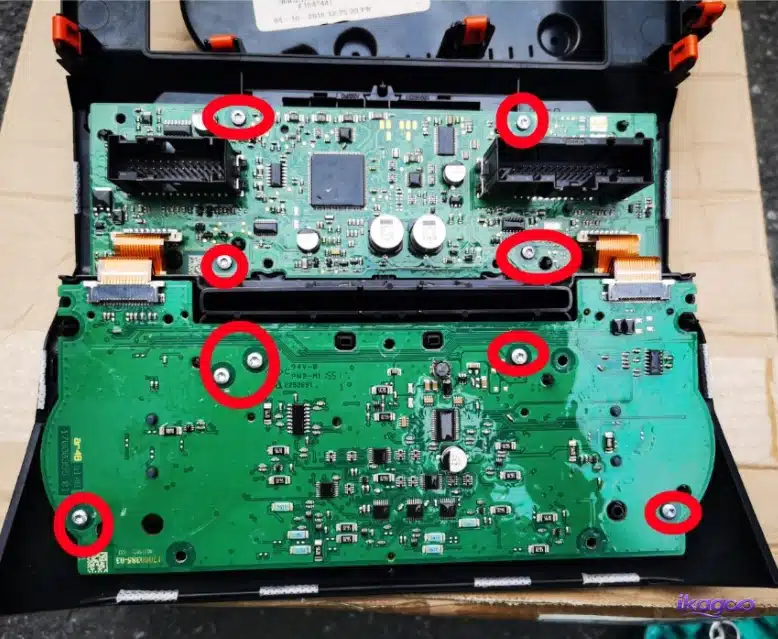
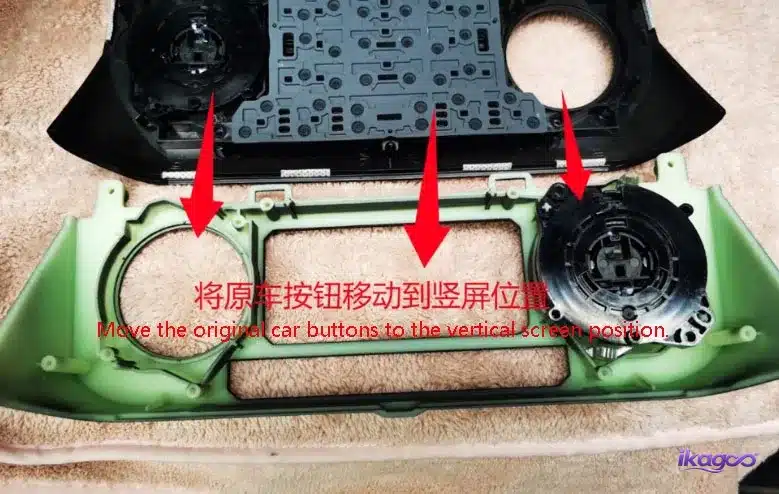
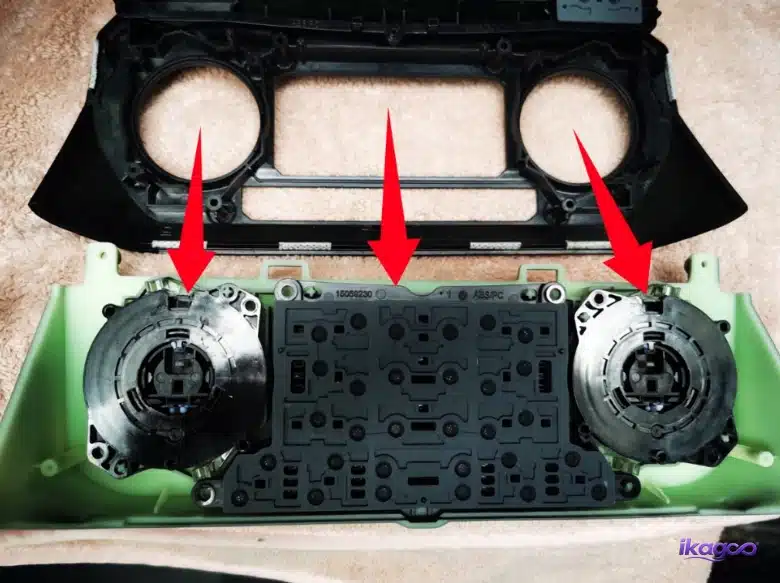
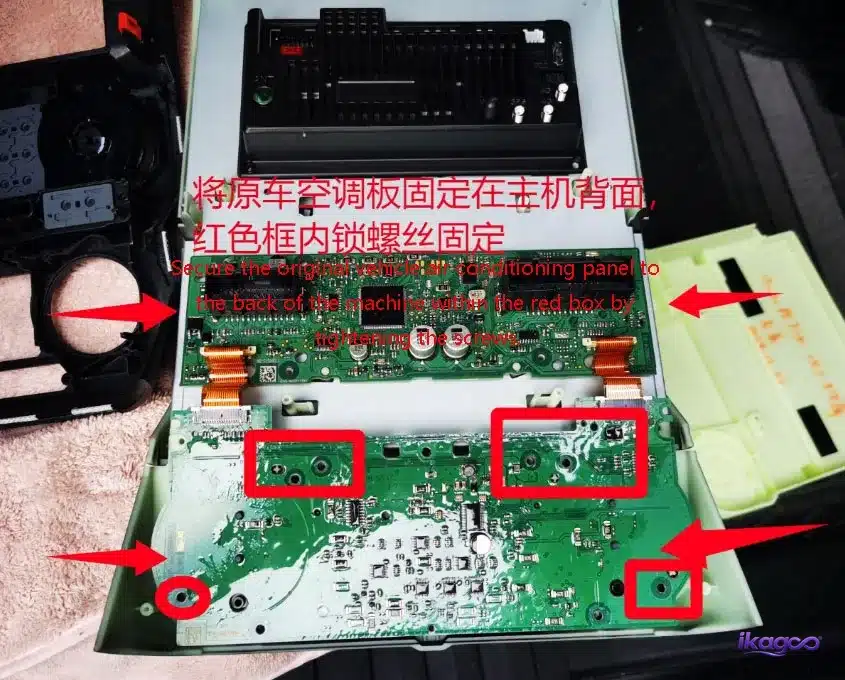
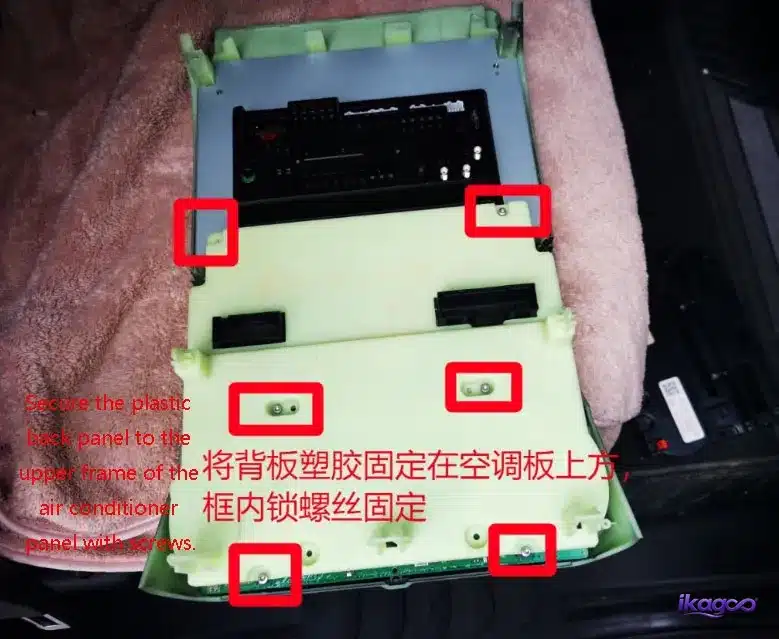
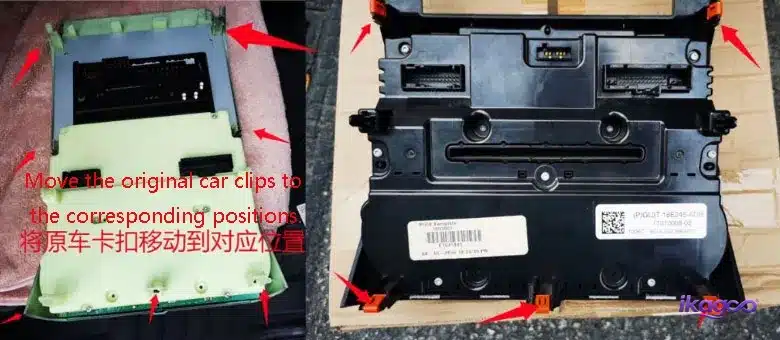
Transfer Factory Clips and Position the Rear Support
Incorrect clip placement can cause uneven panel gaps, unstable trim and dashboard rattles.
Transfer each required factory clip to its matching position on the new fascia. Compare the original and replacement assemblies before positioning the rear support.
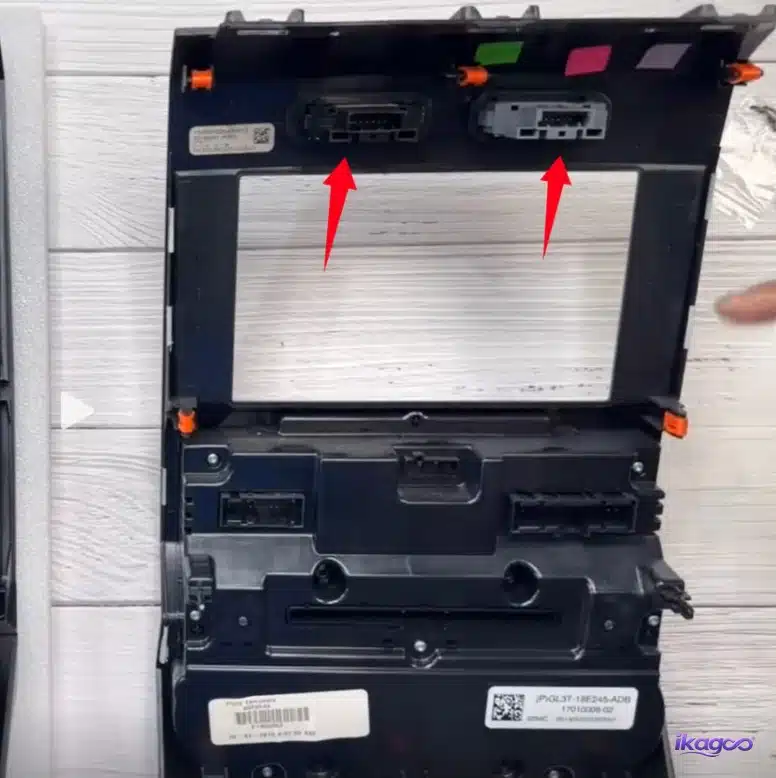
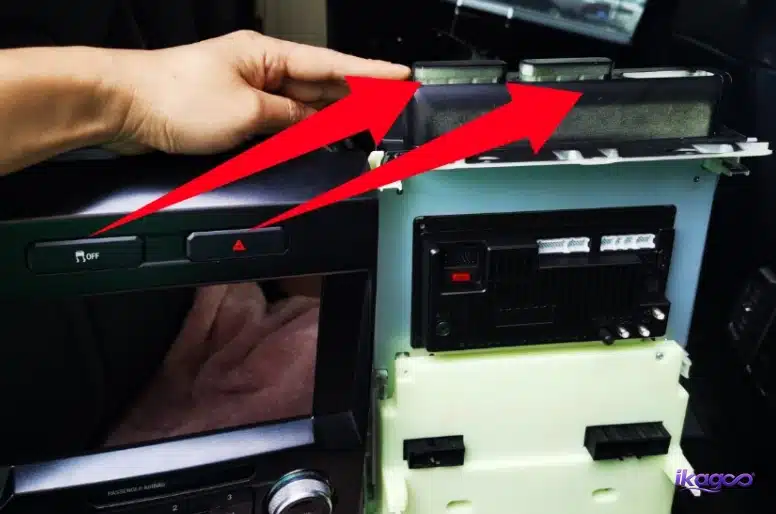
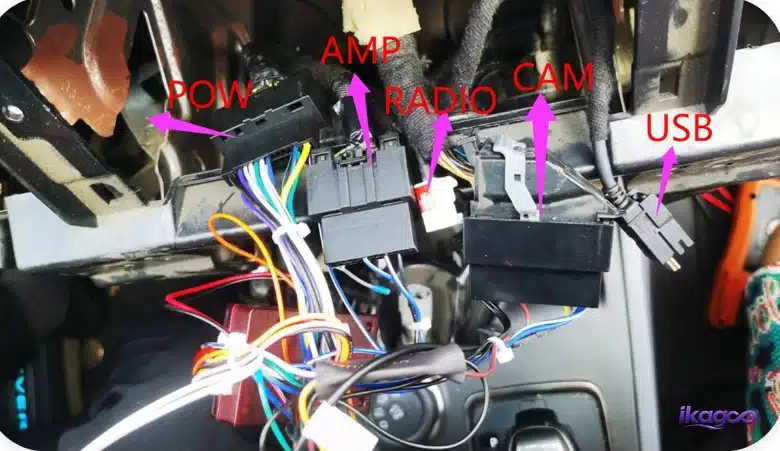
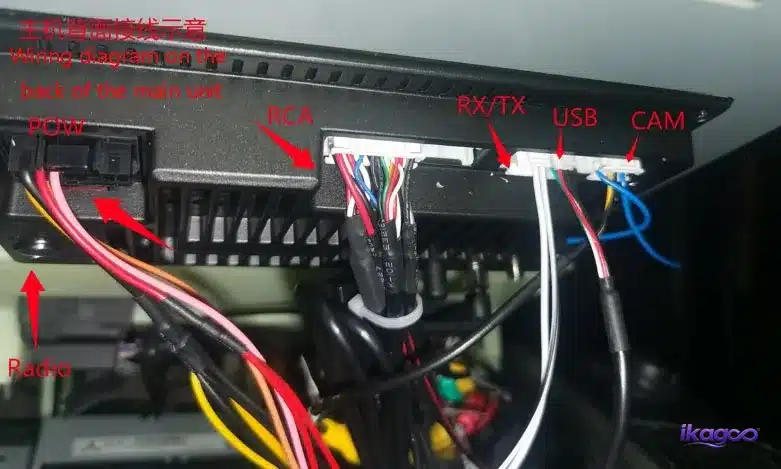
Identify Power, USB, Camera and Amplifier Connections
The presence of a connector does not prove that every function is supported on every Ford F-150.
Review the supplied harness reference before applying power. Confirm the main power, CANBUS, USB, camera, audio and amplifier interfaces against the actual truck configuration.
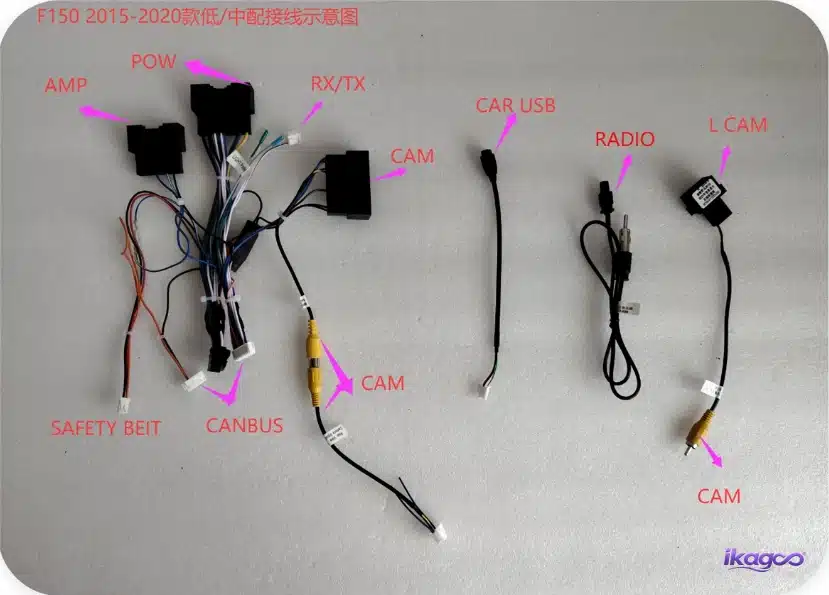
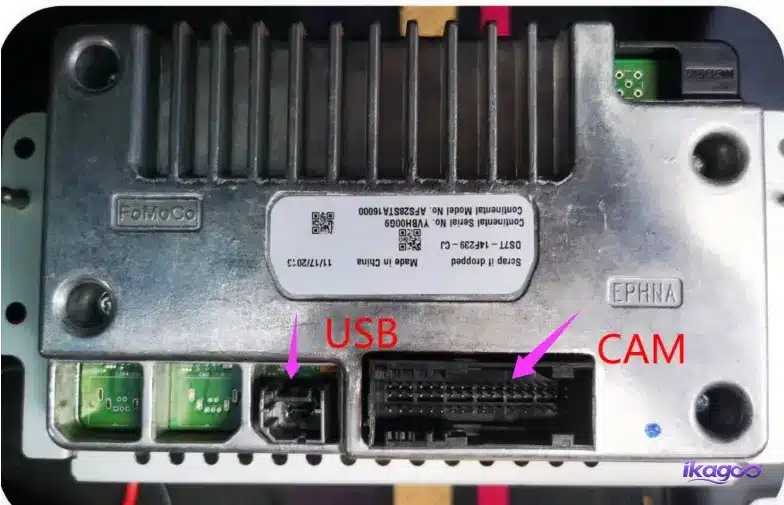
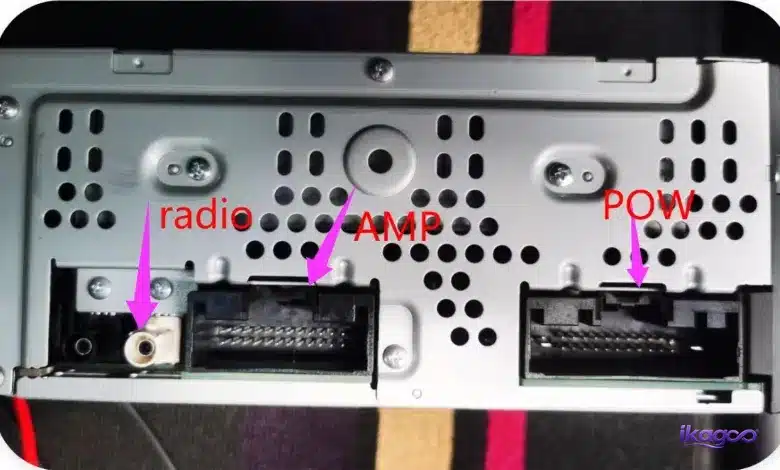
Connect and Route the Vehicle-Specific Harness
Connect one plug at a time and confirm every locking tab before moving to the next connection.
Route the harness away from sharp edges, screw holes, air ducts and areas that could prevent the new screen from sitting flush.
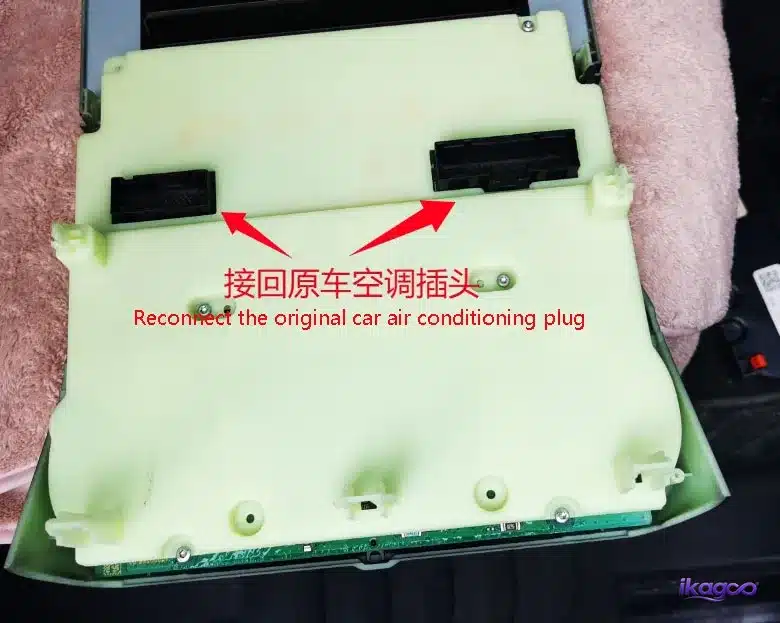
Reassemble the Controls and Seat the Vertical Screen
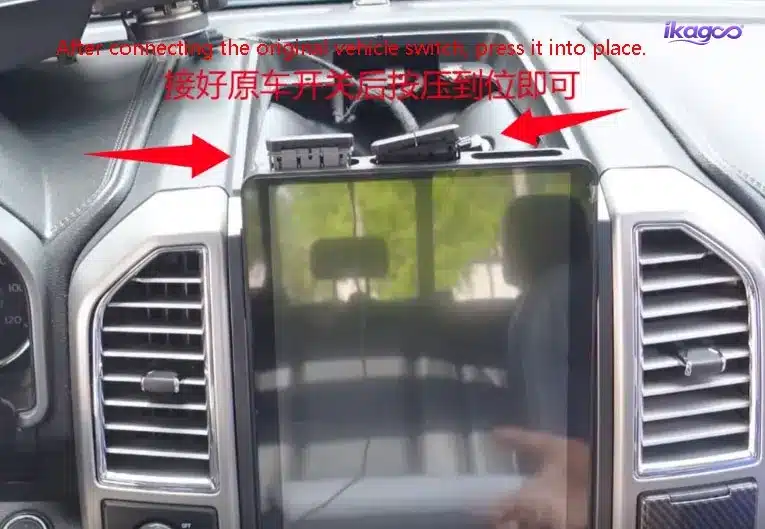
Do not force the display into position over trapped wiring or an incorrectly positioned support.
Reconnect the climate and switch connectors, position the completed display assembly and guide the rear wiring into the available dashboard space.
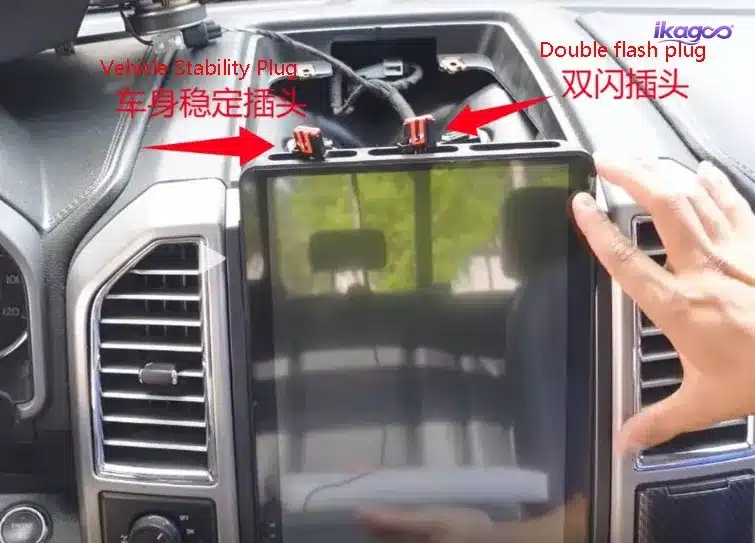
Test Every Function Before Final Closure
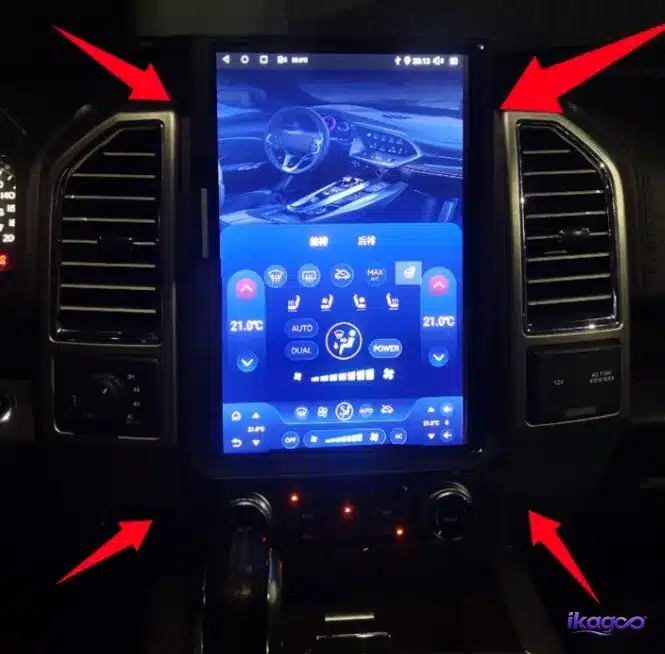
A display that powers on is not proof that the installation is complete.
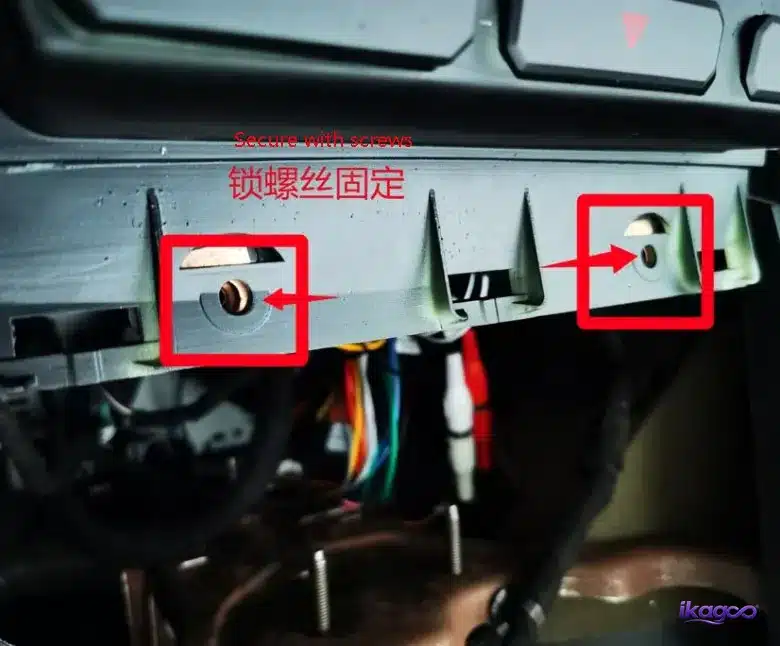
Test the display, touch response, sound, climate controls, hazard switch, ESC switch, steering-wheel controls, camera, amplifier and every other expected retained function before reinstalling the final screws and upper grille.
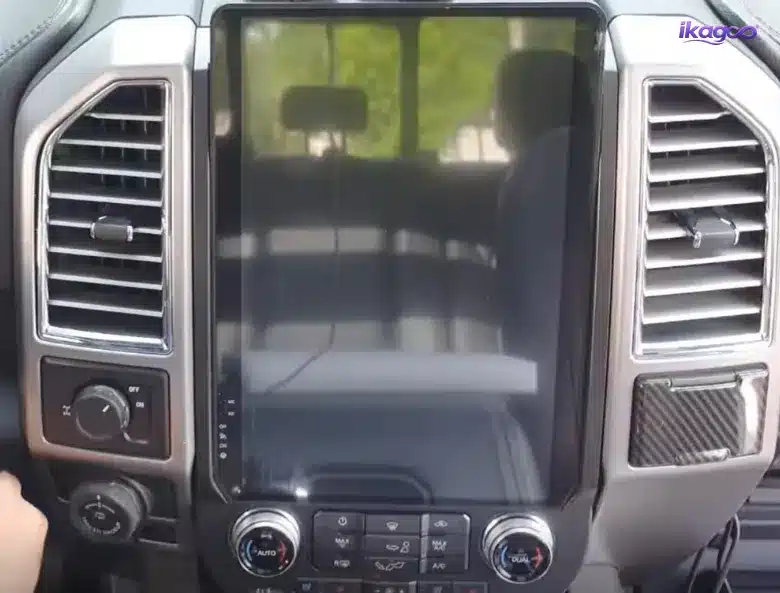
What Must Work Before the Final Trim Is Reinstalled?
Screen and Audio
- Normal startup and shutdown
- Touch response across the complete display
- Sound output from all expected channels
- Normal volume and balance response
- No repeated restarting or unstable operation
Fabrieksinstellingen
- Temperature adjustment
- Fan speed and air direction
- Front and rear defrost
- Hazard and ESC switches
- Bediening op het stuur
Voertuigintegratie
- Rear camera when confirmed
- 360-degree camera when equipped and confirmed
- Factory amplifier and expected audio response
- Original USB interface when supported
- No new vehicle warning lights
Common Problems After a Ford F-150 Vertical-Screen Installation
| Probleem | First Checks | What Not to Do |
|---|---|---|
| Screen does not power on | Main harness lock, power connector, CANBUS interface, fuse and confirmed vehicle profile. | Do not bridge or cut wires without the correct diagram. |
| No sound | Factory amplifier type, amplifier adapter, audio outputs and harness connection. | Do not assume a Sony or amplified system uses the base harness. |
| Camera does not display | Camera type, adapter, decoder, trigger setting and image input. | Do not treat rear-camera and 360-camera systems as identical. |
| Climate controls do not respond | Original climate connector, control-board seating, button alignment and transferred hardware. | Do not close the dashboard until every climate function works. |
| Steering-wheel controls do not work | CANBUS connection, vehicle profile and control settings. | Do not modify unrelated wiring to compensate. |
| Display will not sit flush | Harness routing, rear support, clips, connectors and trapped cables. | Do not force the fascia into position. |
| A new warning light appears | Stop, switch off and recheck every disconnected factory module. | Do not continue driving until the cause is identified. |
Ford F-150 Tesla-Style Radio Installation FAQ
Let iKAGOO Check the Correct Ford F-150 Configuration Before You Buy
iKAGOO does not treat every Ford F-150 as identical. A proper recommendation should account for the fascia, climate controls, audio system, camera interface, wiring and expected retained functions of the actual truck.
Dashboard, screen, climate, audio and camera details are reviewed before recommendation.
Guidance is based on the confirmed product version and actual vehicle configuration.
iKAGOO treats compatibility, support and after-sales responsibility as part of the product value.





Add comment